daikin mini split installation manual

Daikin Mini Split Installation Manual: A Comprehensive Guide
Daikin offers diverse ductless systems, with readily available installation manuals and regional technical data online; proper drainage and piping are crucial for success.
Understanding Daikin Mini Split Systems
Daikin mini-split systems represent a versatile heating and cooling solution, offering ductless operation for targeted comfort and energy efficiency. These systems separate the indoor air handling unit from the outdoor compressor, connected by refrigerant lines and electrical wiring. This design eliminates the need for extensive ductwork, making them ideal for additions, renovations, or homes without existing duct systems.
Understanding the core components – the indoor unit, outdoor unit, and refrigerant lines – is fundamental before beginning installation; Different models cater to various needs, from single-zone systems for individual rooms to multi-zone configurations for whole-house climate control. Proper installation, guided by the official manual, ensures optimal performance and longevity of your Daikin system.
Types of Daikin Mini Split Systems
Daikin offers a range of mini-split systems to suit diverse needs. Single-zone systems are the simplest, connecting one indoor unit to one outdoor unit, ideal for cooling a single room. Multi-zone systems, however, connect multiple indoor units to a single outdoor unit, allowing independent temperature control in various rooms.
Furthermore, Daikin provides both conventional and inverter-driven systems. Inverter technology adjusts compressor speed for consistent comfort and energy savings. The 2MXM18AVJU9 model is a specific R32 split series example. Choosing the right system depends on your home’s size, layout, and cooling/heating requirements; consulting the installation manual is vital for selecting the appropriate model and ensuring correct installation procedures are followed.
Safety Precautions Before Installation
Prior to commencing Daikin mini-split installation, strict adherence to safety protocols is paramount. Always disconnect electrical power to the intended circuit before working with any wiring. Refrigerant handling requires EPA certification; improper handling can cause severe frostbite and environmental damage. Wear appropriate personal protective equipment, including safety glasses and gloves.
Ensure the installation location can support the unit’s weight, and verify structural integrity before mounting. Carefully review the installation manual for specific warnings and cautions related to your model. Proper grounding is essential to prevent electrical shock. Observe all local and national electrical codes during wiring. Ignoring these precautions can lead to injury, property damage, or system malfunction.
Installation Planning & Preparation
Thorough planning, utilizing the installation guide, is vital before starting; consider unit placement, electrical needs, and necessary tools for a smooth installation.
Tools and Materials Required
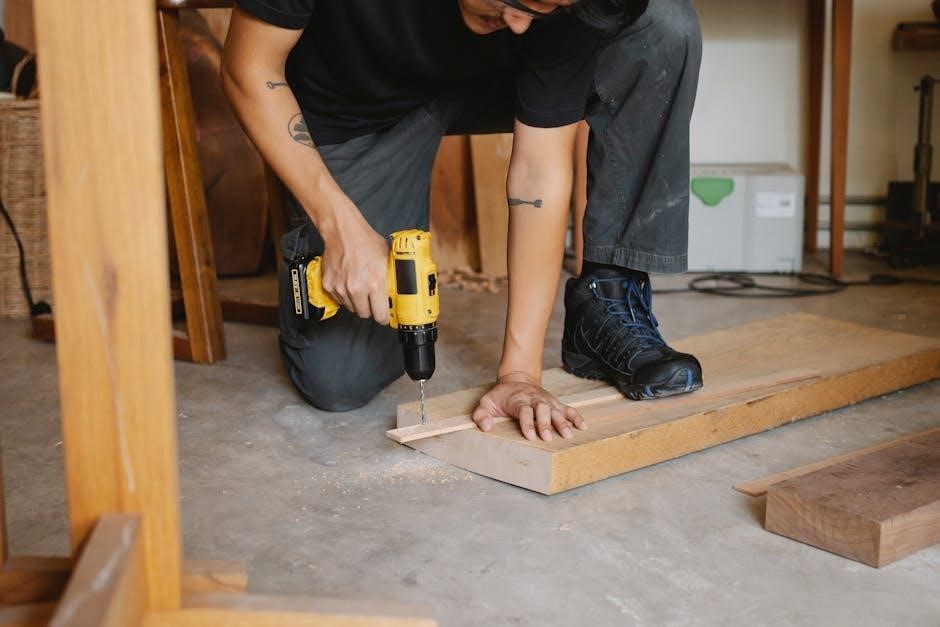
Successful Daikin mini split installation demands a comprehensive toolkit and appropriate materials. Essential tools include a vacuum pump for refrigerant line evacuation, flaring tools for precise copper tubing connections, and a manifold gauge set for accurate refrigerant charging. You’ll also need a reliable drill with various bit sizes for mounting brackets, a tubing cutter for clean pipe sections, and a wrench set to tighten fittings securely.
Beyond tools, gather necessary materials like refrigerant piping (copper is standard), insulation for the refrigerant lines to prevent energy loss, electrical wiring suitable for the unit’s voltage, and appropriate circuit breakers. Don’t forget the condensate drain line, PVC cement, and mounting hardware. Having these readily available streamlines the process and ensures a professional, efficient installation.
Determining Unit Placement (Indoor & Outdoor)
Strategic placement is vital for optimal Daikin mini split performance. Indoor unit location should prioritize even air distribution and avoid direct sunlight or heat sources. Ensure sufficient space – a minimum of 10mm, ideally 30-40mm – around the unit for airflow and maintenance access. Consider aesthetic integration with the room’s design.
Outdoor unit placement requires ample ventilation and protection from extreme weather. Avoid areas prone to snow accumulation or obstructions. Maintain adequate clearance around the unit for service access and to prevent restricted airflow. Ensure the location allows for proper refrigerant line routing, minimizing bends and length. Consider noise levels and potential disturbance to neighbors when selecting the outdoor unit’s position.
Electrical Requirements & Circuit Breaker Sizing
Daikin mini split systems demand careful electrical planning. Verify local electrical codes and regulations before commencing installation. Each unit requires a dedicated circuit to prevent overloading. Consult the unit’s nameplate for precise voltage, amperage, and phase requirements – typically 230V.
Circuit breaker sizing is critical for safety and performance. The breaker must match the unit’s maximum amperage draw, potentially requiring a higher amperage rating than the running amperage. Use appropriately sized wiring, adhering to national and local electrical codes. Proper grounding is essential. Incorrect electrical connections can void the warranty and pose a significant safety hazard. Always disconnect power before working on electrical components.

Indoor Unit Installation
Proper mounting, refrigerant piping connections, and condensate drain line installation are vital steps for successful Daikin indoor unit setup and optimal performance.
Mounting the Indoor Unit
Securely mounting the indoor unit is paramount for quiet operation and longevity. Begin by carefully selecting a location, ensuring sufficient space for airflow – a minimum of 10mm thickness and 30-40mm around the unit is generally recommended. The mounting bracket must be firmly attached to a structurally sound wall, capable of supporting the unit’s weight, and level to prevent drainage issues.
Consider accessibility for future maintenance and servicing when choosing the mounting height. Avoid direct sunlight and heat sources. Prior to drilling, verify the absence of hidden wiring or plumbing. Once the bracket is installed, carefully lift and secure the indoor unit onto it, ensuring all connections are properly aligned before fully tightening the mounting screws. Double-check stability before proceeding to the next installation phase.
Connecting Refrigerant Piping
Proper refrigerant piping connection is critical for system performance and preventing leaks. Carefully flare the refrigerant lines to match the fittings on both the indoor and outdoor units, ensuring a tight seal. Use the correct size piping as specified in the Daikin installation manual for your specific model.
Apply refrigerant oil to the flare before connecting to facilitate sealing and lubrication. Tighten the flare nuts securely, but avoid over-tightening, which can damage the fittings. Route the piping neatly, avoiding sharp bends and kinks that could restrict refrigerant flow. Ensure adequate support for the piping to prevent stress on the connections. Following the guide, proper routing is essential.
Condensate Drain Line Installation
Correct condensate drain line installation is vital to prevent water damage and maintain system efficiency. Route the drain line with a consistent downward slope to ensure proper gravity drainage; avoid any upward loops or sags. Use the specified diameter drain line as outlined in the Daikin installation manual.

Insulate the drain line to prevent condensation formation, especially in humid environments. Ensure the drain line terminates in a suitable drain pan or connection to a building drain, with an air gap to prevent back-siphoning. Following the installation guide, proper drainage is essential for long-term reliability and performance.
Outdoor Unit Installation
Proper positioning and secure electrical connections are key for the outdoor unit; refrigerant line connections require careful leak testing for optimal Daikin system performance.
Positioning the Outdoor Unit
Careful consideration must be given to the outdoor unit’s placement for optimal performance and longevity. Ensure adequate space around the unit – a minimum of 30mm, and preferably 40mm or more, is recommended for proper airflow and maintenance access. Avoid direct sunlight exposure and areas prone to excessive snow accumulation or debris buildup.
The unit should be installed on a stable, level surface capable of supporting its weight, and protected from strong winds. Maintain sufficient clearance for refrigerant piping and electrical connections. Consider the potential for noise transmission to neighboring properties when selecting a location. Refer to the specific Daikin installation manual for your model, as requirements can vary, especially regarding minimum distances from walls and other obstructions. Proper positioning is vital for efficient operation and preventing future issues.
Electrical Connection to the Outdoor Unit
Connecting the outdoor unit’s electrical supply requires strict adherence to local electrical codes and the Daikin installation manual’s specifications. Before commencing any work, ensure the power supply is completely disconnected at the breaker. Correct circuit breaker sizing is paramount to prevent overloads and potential damage; consult the manual for the appropriate amperage.
Use appropriately sized wiring and conduit, ensuring all connections are tight and secure. Proper grounding is essential for safety and to minimize electrical interference. Follow the wiring diagram provided in the manual meticulously. After completing the connections, double-check all wiring before restoring power. Incorrect electrical connections can void the warranty and pose a significant safety hazard.
Refrigerant Line Connection & Leak Testing
Proper refrigerant line connection is vital for system efficiency and longevity. Carefully connect the refrigerant lines to the outdoor unit, ensuring flare nuts are tightened to the manufacturer’s specified torque. Avoid bending or kinking the lines during installation. After connections are made, a thorough leak test must be performed.

Utilize a nitrogen pressure test, applying a pressure higher than the system’s operating pressure, as outlined in the Daikin manual. Check all connections – flare nuts, service valves, and any joints – for leaks using a refrigerant leak detector or a soap bubble solution. Any detected leaks must be repaired before proceeding. A successful leak test guarantees optimal performance and prevents refrigerant loss, protecting the environment.
System Commissioning & Testing
Daikin systems require vacuuming refrigerant lines, precise refrigerant charging, and a thorough test run to verify performance and ensure optimal cooling/heating.
Vacuuming the Refrigerant Lines
Prior to charging the Daikin mini-split system with refrigerant, a thorough evacuation of the refrigerant lines is absolutely critical. This process removes both air and moisture, contaminants that can severely compromise system performance and potentially cause damage to the compressor. Utilize a high-quality vacuum pump capable of achieving a deep vacuum – typically around 500 microns or lower.
Connect the vacuum pump to the refrigerant lines, ensuring all connections are airtight. Operate the pump for a sufficient duration, generally at least 30-60 minutes, or until the desired vacuum level is consistently maintained. Monitoring the vacuum gauge is essential. After achieving the target vacuum, isolate the pump and observe the gauge for any signs of air infiltration, indicating a potential leak in the system. Addressing any leaks before proceeding is paramount for a successful installation.
Charging the Refrigerant
Following a successful vacuum and leak test, carefully charge the Daikin mini-split system with the correct type and amount of refrigerant, as specified on the unit’s nameplate. Using an accurate refrigerant scale is crucial for precise charging; overcharging or undercharging can significantly impact performance and efficiency.
Connect the refrigerant manifold gauge set to the service ports on the outdoor unit. Slowly introduce the refrigerant into the system, monitoring both the pressure and superheat/subcooling readings. Refer to the Daikin installation manual for specific target values. Proper refrigerant charge ensures optimal cooling or heating capacity and prevents compressor damage. Always follow safety guidelines when handling refrigerant.
System Test Run & Performance Verification
After refrigerant charging, initiate a comprehensive system test run. Power on the Daikin mini-split and verify proper operation in both cooling and heating modes. Check for any unusual noises, vibrations, or leaks at all connections. Monitor the airflow from the indoor unit to ensure adequate distribution.
Use a thermometer to measure the supply and return air temperatures, confirming the system achieves the expected temperature difference. Compare the actual performance against the manufacturer’s specifications outlined in the installation manual. Address any discrepancies immediately. Document all test results for future reference and potential troubleshooting. A thorough verification process guarantees optimal system efficiency and longevity.

Troubleshooting Common Installation Issues
Daikin installations may encounter refrigerant leaks or drainage problems; promptly addressing these issues, guided by the manual, ensures optimal system performance and reliability.
Addressing Refrigerant Leaks
Refrigerant leaks within a Daikin mini split system necessitate immediate attention, as they compromise cooling efficiency and potentially harm the environment. The installation manual provides crucial guidance on leak detection methods, often recommending the use of electronic leak detectors to pinpoint the source.
Upon identifying a leak, the system must be evacuated using a vacuum pump – a process detailed in the manual – to remove any remaining refrigerant. Repairing the leak, whether it involves tightening connections, replacing damaged components (like flared fittings or service valves), or brazing, is paramount.
Following the repair, a thorough leak test, typically employing a nitrogen pressure test as outlined in the manual, verifies the integrity of the fix before recharging the system with the correct refrigerant type and quantity. Ignoring leaks can lead to compressor failure and reduced system lifespan.
Resolving Drainage Problems
Proper condensate drainage is vital for Daikin mini split operation, preventing water damage and mold growth. The installation manual emphasizes correct drain line installation, ensuring a consistent downward slope and avoiding kinks or obstructions. If drainage issues arise, the first step is to inspect the drain line for clogs – often caused by algae or dust.
Flushing the drain line with a mild bleach solution (following manual guidelines) can effectively clear blockages. Ensuring sufficient space around the indoor unit – a minimum of 40mm – facilitates proper airflow and condensate evaporation.
For persistent problems, verify the drain pan isn’t full and that the external drain outlet isn’t obstructed. Incorrect installation, as detailed in the manual, is a common cause; re-routing or adjusting the drain line may be necessary to guarantee efficient water removal.
Need to install your Daikin mini split? Find the official installation manual & get it done right! Step-by-step instructions, diagrams & troubleshooting. Daikin mini split installation made simple.